.NET Core 分布式任務(wù)調(diào)度ScheduleMaster詳解
目錄
- 1.什么是ScheduleMaster
- 2.使用ScheduleMaster
- 1.配置Http調(diào)度任務(wù)
- 2.配置程序集調(diào)度任務(wù)
- 3.使用Api接入任務(wù)
- 1.API Server 對(duì)接流程
- 2.創(chuàng)建程序集任務(wù)
- 3.創(chuàng)建HTTP任務(wù)
- 4.創(chuàng)建延時(shí)任務(wù)
- 4.框架簡(jiǎn)單分析
- 1.全局設(shè)計(jì)
- 2.Master和Work分析
1.什么是ScheduleMaster
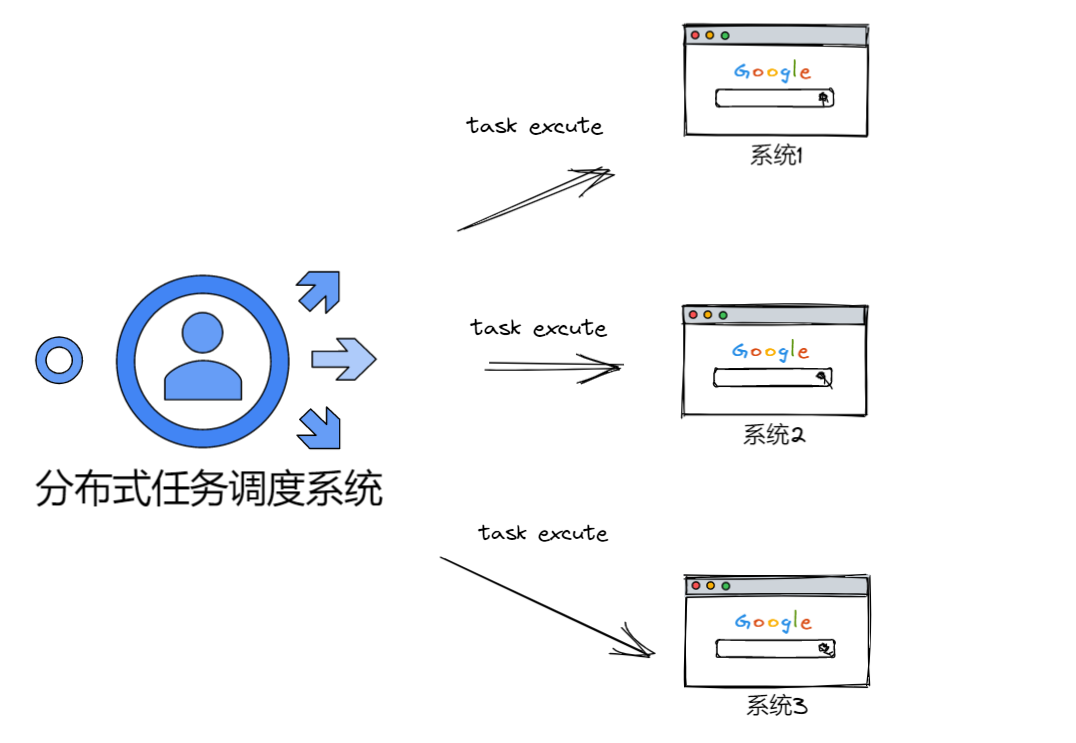
ScheduleMaster是分布式任務(wù)調(diào)度系統(tǒng),是國(guó)內(nèi)的一位開(kāi)發(fā)者寫(xiě)的。簡(jiǎn)稱:集中任務(wù)調(diào)度系統(tǒng),最簡(jiǎn)單的理解ScheduleMaster,就是對(duì)不同的系統(tǒng)里面的調(diào)度任務(wù)做統(tǒng)一管理的框架。
例如我們現(xiàn)在有多個(gè)系統(tǒng),每個(gè)系統(tǒng)針對(duì)自己處理不同的業(yè)務(wù)場(chǎng)景。衍生出自己的調(diào)度任務(wù),想象一下,如果每個(gè)系統(tǒng)人為去維護(hù),那隨著調(diào)度任務(wù)越來(lái)越多,人是崩潰的吧,可見(jiàn)維護(hù)和技術(shù)成本是巨大的,這時(shí)我們需要選擇分布式任務(wù)系統(tǒng)框架做統(tǒng)一的管理
當(dāng)然有目前有很多相對(duì)優(yōu)秀分布式任務(wù)系統(tǒng)框架,我們主要學(xué)習(xí) ScheduleMaster
2.使用ScheduleMaster
1.首先我們需要使用NET Core web Api創(chuàng)建幾個(gè)模擬的微服務(wù),分別為 考勤、算薪、郵件、短信

2.下載開(kāi)源的ScheduleMaster,并且使用ScheduleMaster調(diào)度我們的微服務(wù)接口
- sqlserver:"Persist Security Info = False; User ID =sa; Password =123456; Initial Catalog =schedule_master; Server =."
- postgresql:"Server=localhost;Port=5432;Database=schedule_master;User Id=postgres;Password=123456;Pooling=true;MaxPoolSize=20;"
- mysql:"Data Source=localhost;Database=schedule_master;User ID=root;Password=123456;pooling=true;CharSet=utf8mb4;port=3306;sslmode=none;TreatTinyAsBoolean=true"
修改Host的配置文件和支持的數(shù)據(jù)庫(kù),框架默認(rèn)使用Mysql
修改Web的配置文件和支持的數(shù)據(jù)庫(kù),框架默認(rèn)使用Mysql
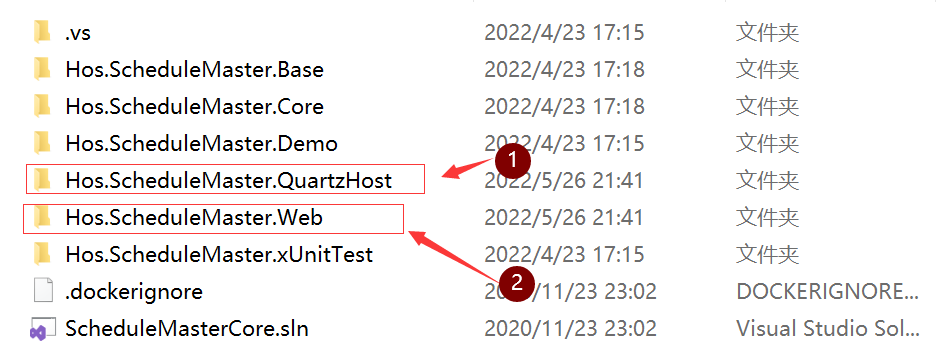
3.進(jìn)入Hos.ScheduleMaster.Web項(xiàng)目的發(fā)布目錄,dotnet Hos.ScheduleMaster.Web.dll啟動(dòng)項(xiàng)目 ,此時(shí)會(huì)生成數(shù)據(jù)庫(kù)
登錄賬號(hào):admin
密碼:111111
4.進(jìn)入Hos.ScheduleMaster.QuartzHost項(xiàng)目的發(fā)布目錄,執(zhí)行命令,啟動(dòng)項(xiàng)目
dotnet Hos.ScheduleMaster.QuartzHost.dll --urls http://*:30003
1.配置Http調(diào)度任務(wù)
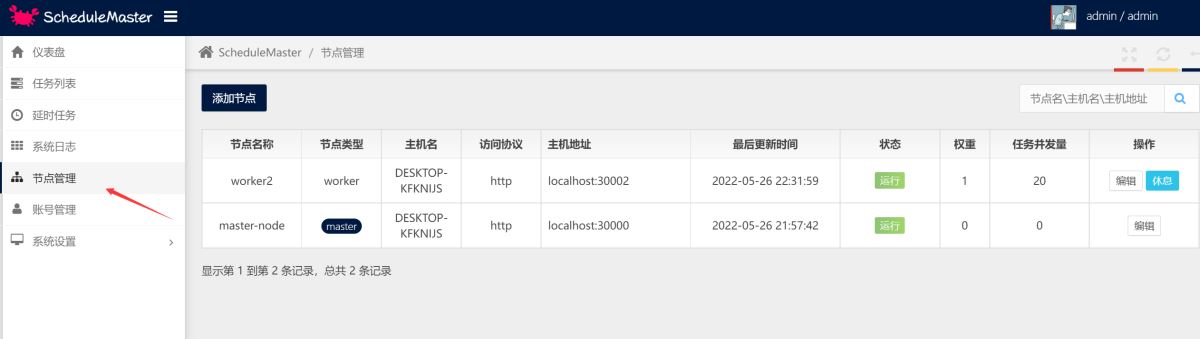
5.準(zhǔn)備就緒后,使用后臺(tái)查看節(jié)點(diǎn)管理,可以看到web主節(jié)點(diǎn)30000和任務(wù)調(diào)度的接口30002已經(jīng)在運(yùn)行
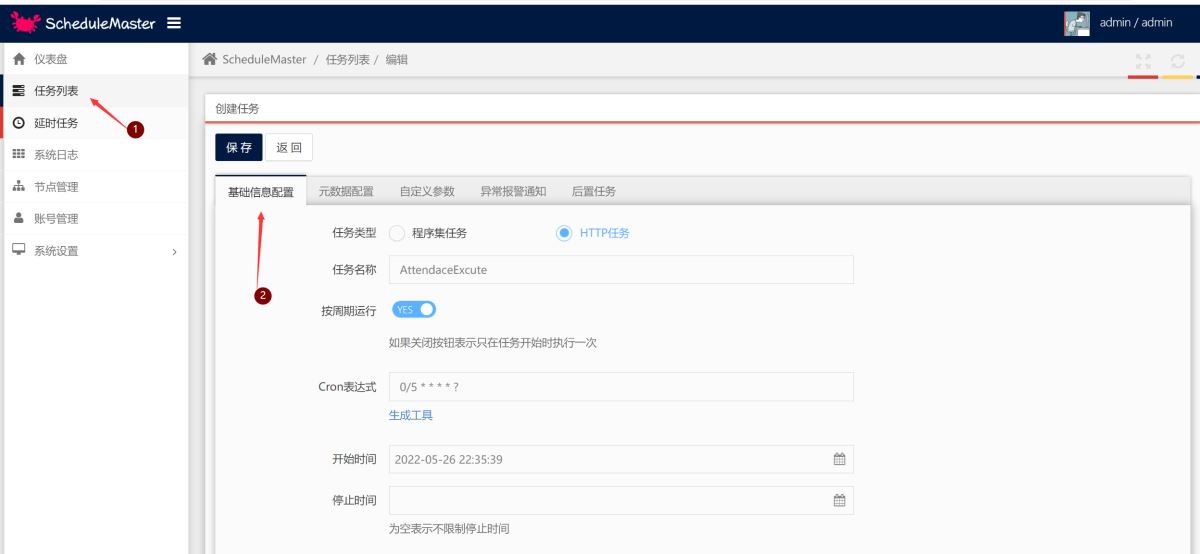
6.使用任務(wù)列表菜單,創(chuàng)建定時(shí)調(diào)度任務(wù),配置基礎(chǔ)信息和元數(shù)據(jù)配置,然后點(diǎn)擊保存就開(kāi)始執(zhí)行任務(wù)
2.配置程序集調(diào)度任務(wù)
1.創(chuàng)建一個(gè)類庫(kù),安裝ScheduleMaster庫(kù), 創(chuàng)建一個(gè)類繼承TaskBase,實(shí)現(xiàn)抽象方法,然后編譯程序集
namespace TaskExcuteService{ class AssemblyTask : TaskBase {public override void Run(TaskContext context){ context.WriteLog("程序集任務(wù)");} }}2.找到debug目錄,去掉Base程序集,然后添加為壓縮文件
3.在web界面找到任務(wù)配置,選擇程序集進(jìn)行基本配置,配置元數(shù)據(jù),輸入程序集名稱,然后輸入類,并將程序集上傳,保存就可以運(yùn)行了
3.使用Api接入任務(wù)
為了方便業(yè)務(wù)系統(tǒng)更好的接入調(diào)度系統(tǒng),ScheduleMaster創(chuàng)建任務(wù)不僅可以在控制臺(tái)中實(shí)現(xiàn),系統(tǒng)也提供了WebAPI供業(yè)務(wù)系統(tǒng)使用代碼接入,這種方式對(duì)延時(shí)任務(wù)來(lái)說(shuō)尤其重要。
1.API Server 對(duì)接流程
- 在控制臺(tái)中創(chuàng)建好專用的API對(duì)接用戶賬號(hào)。
- 使用對(duì)接賬號(hào)的用戶名設(shè)置為http header中的
ms_auth_user值。 - 使用經(jīng)過(guò)哈希運(yùn)算過(guò)的秘鑰設(shè)置為http header中的
ms_auth_secret值,計(jì)算規(guī)則:按{用戶名}{hash(密碼)}{用戶名}的格式拼接得到字符串str,然后再對(duì)str做一次hash運(yùn)算即得到最終秘鑰,hash函數(shù)是小寫(xiě)的32位MD5算法。 - 使用form格式發(fā)起http調(diào)用,如果非法用戶會(huì)返回401-Unauthorized。
HttpClient client = new HttpClient();client.DefaultRequestHeaders.Add("ms_auth_user", "admin");client.DefaultRequestHeaders.Add("ms_auth_secret", SecurityHelper.MD5($"admin{SecurityHelper.MD5("111111")}}admin"));所有接口采用統(tǒng)一的返回格式,字段如下:
2.創(chuàng)建程序集任務(wù)
使用API創(chuàng)建任務(wù)的方式不支持上傳程序包,所以在任務(wù)需要啟動(dòng)時(shí)要確保程序包已通過(guò)其他方式上傳,否則會(huì)啟動(dòng)失敗。
- 接口地址:
http://yourip:30000/api/task/create - 請(qǐng)求類型:
POST - 參數(shù)格式:
application/x-www-form-urlencoded - 返回結(jié)果:創(chuàng)建成功返回任務(wù)id
- 參數(shù)列表:
ScheduleParam:
HttpClient client = new HttpClient();List<KeyValuePair<string, string>> args = new List<KeyValuePair<string, string>>();args.Add(new KeyValuePair<string, string>("MetaType", "1"));args.Add(new KeyValuePair<string, string>("RunLoop", "true"));args.Add(new KeyValuePair<string, string>("CronExpression", "33 0/8 * * * ?"));args.Add(new KeyValuePair<string, string>("Remark", "By Xunit Tester Created"));args.Add(new KeyValuePair<string, string>("StartDate", DateTime.Today.ToString("yyyy-MM-dd HH:mm:ss")));args.Add(new KeyValuePair<string, string>("Title", "程序集接口測(cè)試任務(wù)"));args.Add(new KeyValuePair<string, string>("AssemblyName", "Hos.ScheduleMaster.Demo"));args.Add(new KeyValuePair<string, string>("ClassName", "Hos.ScheduleMaster.Demo.Simple"));args.Add(new KeyValuePair<string, string>("CustomParamsJson", "[{\"ParamKey\":\"k1\",\"ParamValue\":\"1111\",\"ParamRemark\":\"r1\"},{\"ParamKey\":\"k2\",\"ParamValue\":\"2222\",\"ParamRemark\":\"r2\"}]"));args.Add(new KeyValuePair<string, string>("Keepers", "1"));args.Add(new KeyValuePair<string, string>("Keepers", "2"));//args.Add(new KeyValuePair<string, string>("Nexts", ""));//args.Add(new KeyValuePair<string, string>("Executors", ""));HttpContent reqContent = new FormUrlEncodedContent(args);var response = await client.PostAsync("http://localhost:30000/api/Task/Create", reqContent);var content = await response.Content.ReadAsStringAsync();Debug.WriteLine(content);3.創(chuàng)建HTTP任務(wù)
- 接口地址:
http://yourip:30000/api/task/create - 請(qǐng)求類型:
POST - 參數(shù)格式:
application/x-www-form-urlencoded - 返回結(jié)果:創(chuàng)建成功返回任務(wù)id
- 參數(shù)列表:
HttpClient client = new HttpClient();List<KeyValuePair<string, string>> args = new List<KeyValuePair<string, string>>();args.Add(new KeyValuePair<string, string>("MetaType", "2"));args.Add(new KeyValuePair<string, string>("RunLoop", "true"));args.Add(new KeyValuePair<string, string>("CronExpression", "22 0/8 * * * ?"));args.Add(new KeyValuePair<string, string>("Remark", "By Xunit Tester Created"));args.Add(new KeyValuePair<string, string>("StartDate", DateTime.Today.ToString("yyyy-MM-dd HH:mm:ss")));args.Add(new KeyValuePair<string, string>("Title", "Http接口測(cè)試任務(wù)"));args.Add(new KeyValuePair<string, string>("HttpRequestUrl", "http://localhost:56655/api/1.0/value/jsonpost"));args.Add(new KeyValuePair<string, string>("HttpMethod", "POST"));args.Add(new KeyValuePair<string, string>("HttpContentType", "application/json"));args.Add(new KeyValuePair<string, string>("HttpHeaders", "[]"));args.Add(new KeyValuePair<string, string>("HttpBody", "{ \"Posts\": [{ \"PostId\": 666, \"Title\": \"tester\", \"Content\":\"testtesttest\" }], \"BlogId\": 111, \"Url\":\"qweqrrttryrtyrtrtrt\" }"));HttpContent reqContent = new FormUrlEncodedContent(args);var response = await client.PostAsync("http://localhost:30000/api/Task/Create", reqContent);var content = await response.Content.ReadAsStringAsync();Debug.WriteLine(content);4.創(chuàng)建延時(shí)任務(wù)
- 接口地址:
http://yourip:30000/api/delaytask/create - 請(qǐng)求類型:
POST - 參數(shù)格式:
application/x-www-form-urlencoded - 返回結(jié)果:創(chuàng)建成功返回任務(wù)id
- 參數(shù)列表:
for (int i = 0; i < 5; i++){ int rndNum = new Random().Next(20, 500); List<KeyValuePair<string, string>> args = new List<KeyValuePair<string, string>>(); args.Add(new KeyValuePair<string, string>("SourceApp", "TestApp")); args.Add(new KeyValuePair<string, string>("Topic", "TestApp.Trade.TimeoutCancel")); args.Add(new KeyValuePair<string, string>("ContentKey", i.ToString())); args.Add(new KeyValuePair<string, string>("DelayTimeSpan", rndNum.ToString())); args.Add(new KeyValuePair<string, string>("DelayAbsoluteTime", DateTime.Now.AddSeconds(rndNum).ToString("yyyy-MM-dd HH:mm:ss"))); args.Add(new KeyValuePair<string, string>("NotifyUrl", "http://localhost:56655/api/1.0/value/delaypost")); args.Add(new KeyValuePair<string, string>("NotifyDataType", "application/json")); args.Add(new KeyValuePair<string, string>("NotifyBody", "{ \"Posts\": [{ \"PostId\": 666, \"Title\": \"tester\", \"Content\":\"testtesttest\" }], \"BlogId\": 111, \"Url\":\"qweqrrttryrtyrtrtrt\" }")); HttpContent reqContent = new FormUrlEncodedContent(args); var response = await client.PostAsync("http://localhost:30000/api/DelayTask/Create", reqContent); var content = await response.Content.ReadAsStringAsync(); Debug.WriteLine(content);}4.框架簡(jiǎn)單分析
1.全局設(shè)計(jì)
根據(jù)官網(wǎng)的設(shè)計(jì)圖,以及操作的流程,簡(jiǎn)單總結(jié)一下任務(wù)全局流程為客戶端—–>master——>work—–>執(zhí)行任務(wù)。從大的架構(gòu)方向的思想就是,將原有單個(gè)服務(wù)中業(yè)務(wù)和任務(wù)調(diào)度混合的方式做一些改變,使業(yè)務(wù)和調(diào)度分離,專門把任務(wù)調(diào)度部分剝離出來(lái),作為一個(gè)獨(dú)立的進(jìn)程,來(lái)統(tǒng)一調(diào)用和管理任務(wù),而原有服務(wù)只做業(yè)務(wù)處理。

2.Master和Work分析
我們主要從主節(jié)點(diǎn),從節(jié)點(diǎn),數(shù)據(jù)表這幾個(gè)方面來(lái)簡(jiǎn)單分析,整個(gè)業(yè)務(wù)的時(shí)序流程,從本質(zhì)來(lái)看并不復(fù)雜master和Work之間的關(guān)系是相互配合的,可能乍一看下面整個(gè)圖有點(diǎn)混亂,下面來(lái)解釋一下,其實(shí)Master節(jié)點(diǎn)將任務(wù)添加到數(shù)據(jù)中,然后work節(jié)點(diǎn),去從對(duì)應(yīng)的數(shù)據(jù)表中取出任務(wù)數(shù)據(jù),然后根據(jù)任務(wù)對(duì)應(yīng)的配置,生成配置信息,調(diào)用Quartz執(zhí)行任務(wù),這就是我們整個(gè)框架中最核心的業(yè)務(wù)。
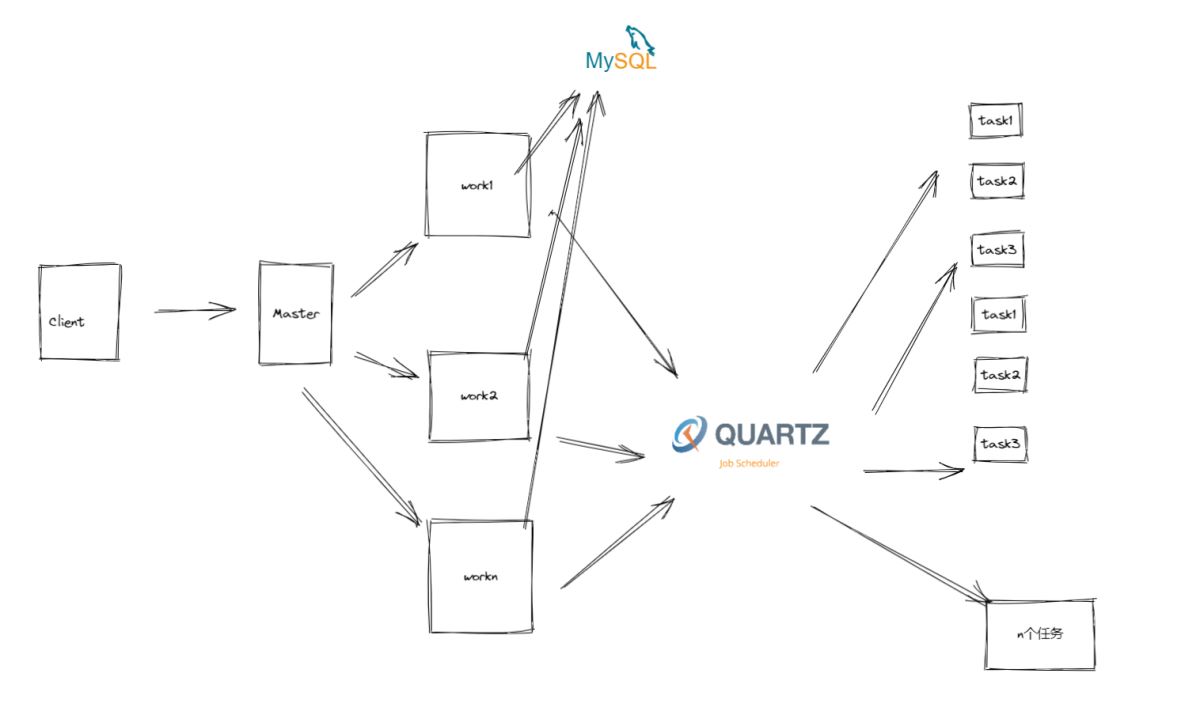
當(dāng)然master和work除了主要承載了整個(gè)管理系統(tǒng)的UI可視化、后臺(tái)業(yè)務(wù)操作、任務(wù)執(zhí)行之外,如果從細(xì)節(jié)以及實(shí)現(xiàn)方式來(lái)說(shuō)主要做了以下事情:
Master
- 1.分配任務(wù)執(zhí)行和選擇節(jié)點(diǎn)
- 2.對(duì)work節(jié)點(diǎn)進(jìn)行健康檢查,對(duì)任務(wù)進(jìn)行故障轉(zhuǎn)移
Work
- 1.取出任務(wù)配置信息
- 2.使用Quartz根據(jù)配置運(yùn)行任務(wù)
- 3.使用反射調(diào)用程序集
- 4.使用httpclient調(diào)用http 接口
到此這篇關(guān)于分布式任務(wù)調(diào)度ScheduleMaster的文章就介紹到這了,更多相關(guān)分布式任務(wù)調(diào)度ScheduleMaster內(nèi)容請(qǐng)搜索以前的文章或繼續(xù)瀏覽下面的相關(guān)文章希望大家以后多多支持!
 網(wǎng)公網(wǎng)安備