SpringBoot中使用 RabbitMQ的教程詳解
本章主要建立在已經(jīng)安裝好Erlang以及RabbitMQ的基礎(chǔ)上,接下來,簡單介紹一下使用
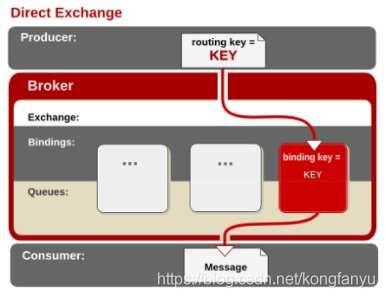
一、Direct直接模式
通過routingKey和exchange決定的那個唯一的queue可以接收消息
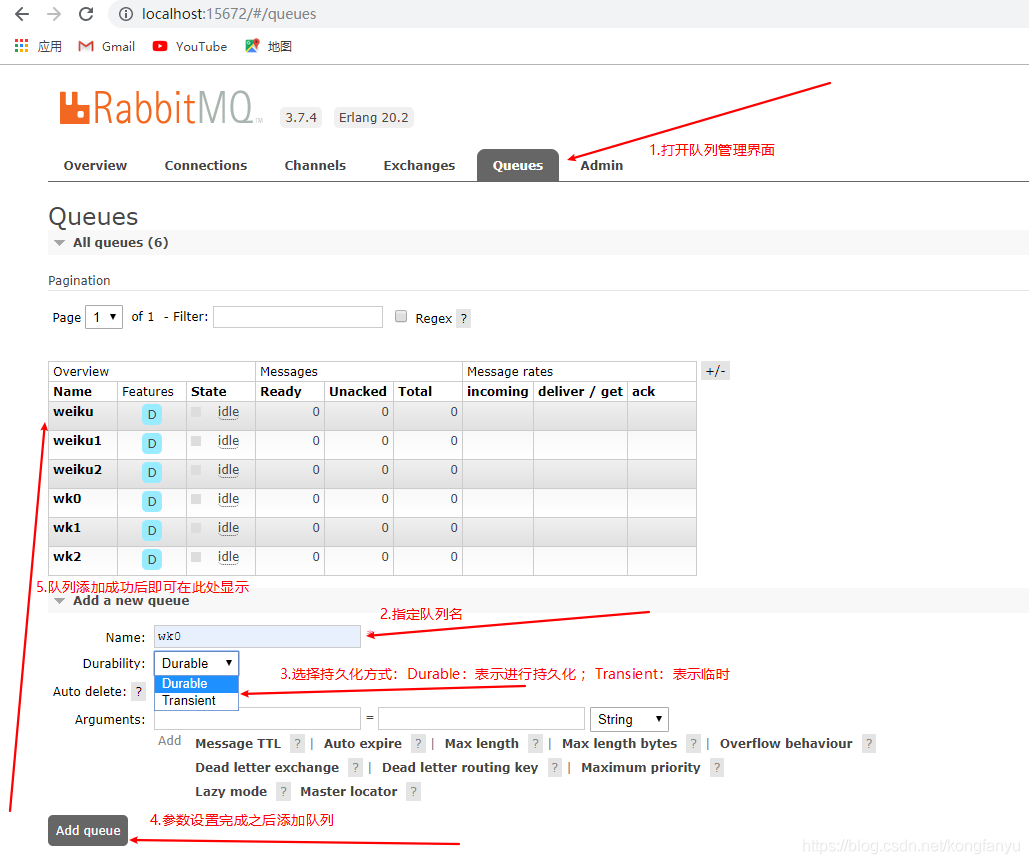
1、首先到RabbitMQ的管理界面新建一個隊列(Direct模式)
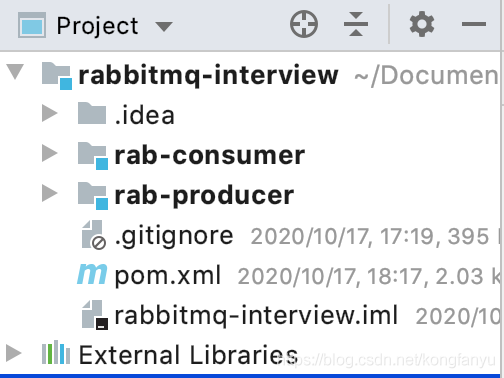
2、測試項目的基礎(chǔ)結(jié)構(gòu)如下:
這里為了方便測試,直接在父項目中建立兩個子模塊(生產(chǎn)者和消費者)
3、pom.xml文件的依賴如下:
父項目:
<?xml version='1.0' encoding='UTF-8'?><project xmlns='http://maven.apache.org/POM/4.0.0' xmlns:xsi='http://www.w3.org/2001/XMLSchema-instance' xsi:schemaLocation='http://maven.apache.org/POM/4.0.0 https://maven.apache.org/xsd/maven-4.0.0.xsd'> <modelVersion>4.0.0</modelVersion> <packaging>pom</packaging> <modules> <module>rab-consumer</module> <module>rab-producer</module> </modules> <parent> <groupId>org.springframework.boot</groupId> <artifactId>spring-boot-starter-parent</artifactId> <version>2.0.7.RELEASE</version> <relativePath/> <!-- lookup parent from repository --> </parent> <groupId>interview</groupId> <artifactId>rabbitmq-interview</artifactId> <version>0.0.1-SNAPSHOT</version> <name>rabbitmq-interview</name> <description>Demo rabbitmq project for Spring Boot</description> <properties> <java.version>1.8</java.version> </properties> <dependencies> <!--1、amqp高級消息隊列的依賴--> <dependency> <groupId>org.springframework.boot</groupId> <artifactId>spring-boot-starter-amqp</artifactId> </dependency><!--2、測試的依賴--> <dependency> <groupId>org.springframework.boot</groupId> <artifactId>spring-boot-starter-test</artifactId> </dependency> <dependency> <groupId>org.springframework.amqp</groupId> <artifactId>spring-rabbit-test</artifactId> <scope>test</scope> </dependency> </dependencies> <build> <plugins> <plugin> <groupId>org.springframework.boot</groupId> <artifactId>spring-boot-maven-plugin</artifactId> </plugin> </plugins> </build></project>
4、準(zhǔn)備發(fā)送的數(shù)據(jù)
回到IDEA中,打開子模塊的生產(chǎn)者模塊,我這邊是rab_producer,在resource下建立springboot的配置文件:application.yml文件,內(nèi)容如下:
spring: rabbitmq: host: localhost# host 為RabbitMQ主機的地址
之后新建一個SpringBoot的啟動類:
@SpringBootApplicationpublic class RabbitMQApplication { public static void main(String[] args) { SpringApplication.run(RabbitMQApplication.class); }}
然后新建測試類:
@RunWith(SpringRunner.class) // 固定寫法@SpringBootTest(classes = RabbitMQApplication.class) // SpringBoot啟動類(自定義的)public class RabTest { @Autowired private RabbitTemplate rabbitTemplate; // 注入一個RabbitMQ的模板對象,操作消息隊列的對象 // 發(fā)送一條點對點(Direct)的消息,又稱為直連 @Test public void sendQueue(){ System.out.println('開始向隊列中發(fā)送一條消息!'); // 參數(shù)1:管理中的隊列名 參數(shù)2:發(fā)送的消息 rabbitTemplate.convertAndSend('weiku','message:這是一條消息!'); System.out.println('消息發(fā)送完畢!'); }}
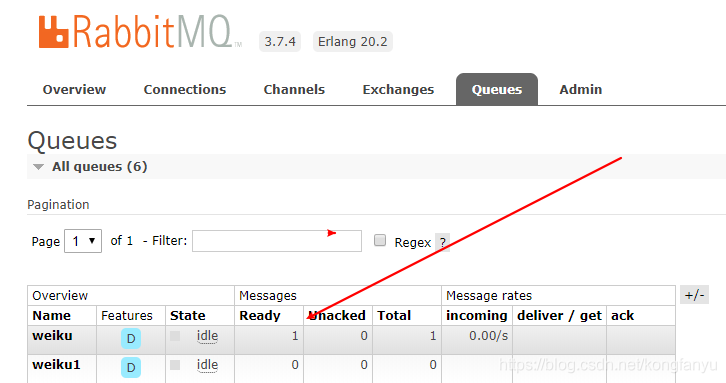
運行測試方法即可把消息發(fā)送到隊列(weiku)中。
如果消息未被消費,可在管理界面查看到:
3、準(zhǔn)備消費者接收消息
回到IDEA中,打開子模塊的消費者模塊,我這邊是rab_consumer,在子模塊中創(chuàng)建一個啟動類,內(nèi)容如下:

@SpringBootApplicationpublic class RabbitMQApplication { public static void main(String[] args) { SpringApplication.run(RabbitMQApplication.class); }}
完成之后,定義一個接收消息的監(jiān)聽器,并且注入到Spring容器中,代碼如下:
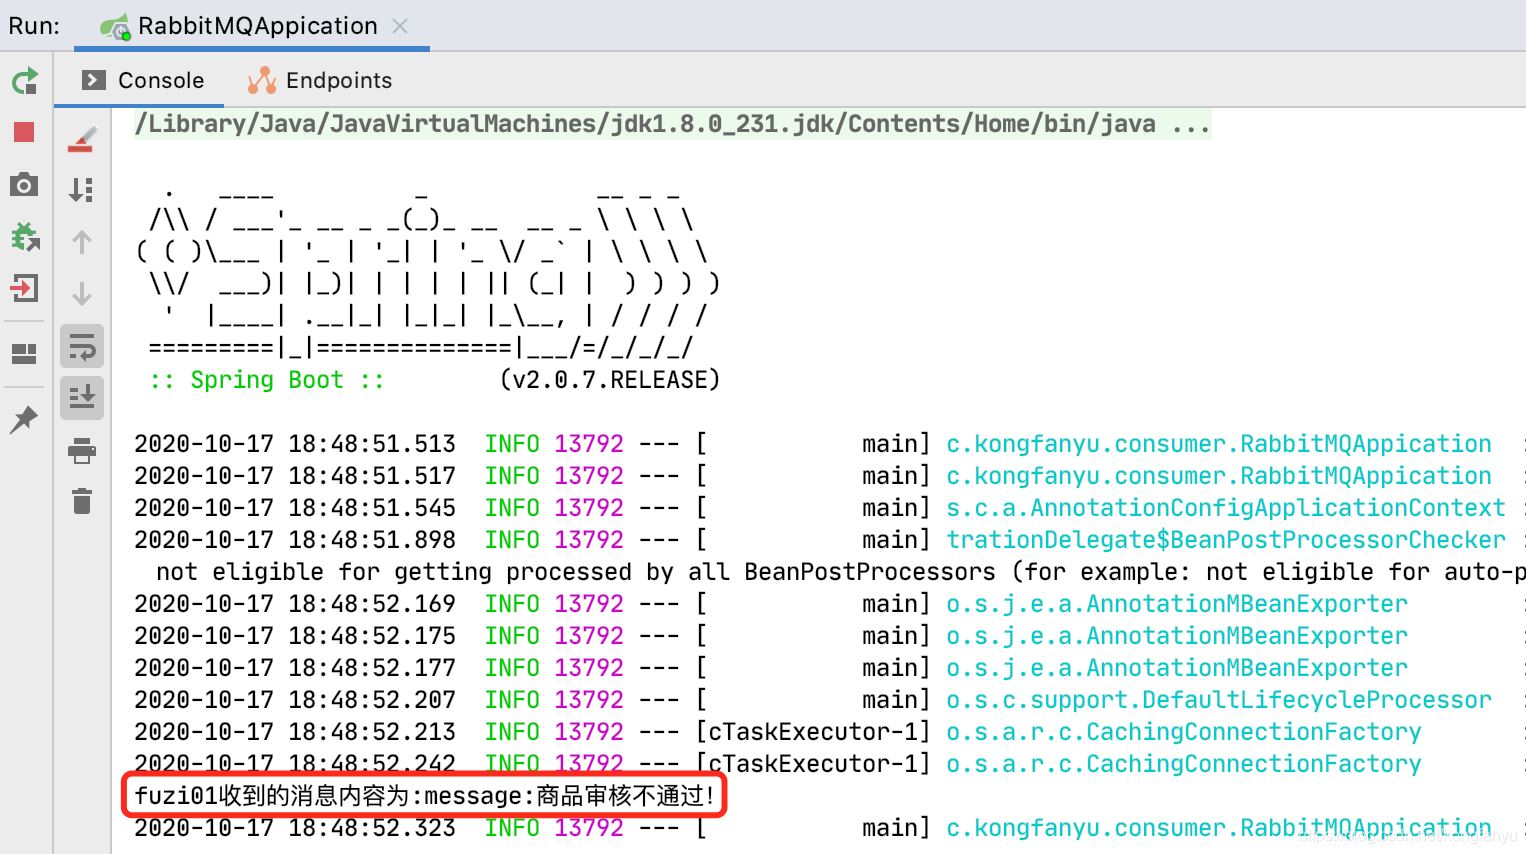
@Component // 需要注入到Spring容器中@RabbitListener(queues = 'weiku') // 指定監(jiān)聽的隊列名public class Consumer1 { @RabbitHandler // 消息接收處理 public void showMSG(String message){ // 得到我們producer中發(fā)送的Object數(shù)據(jù),此處可根據(jù)傳過來的類型來選擇接收,否則拋出異常 System.out.println('weiku收到的消息內(nèi)容為:' + message); }}
準(zhǔn)備完成之后,運行啟動類可接收到我們剛剛發(fā)送的Direct點對點的消息,這種模式的消息只能被一個消費者所消費到,運行結(jié)果如下:
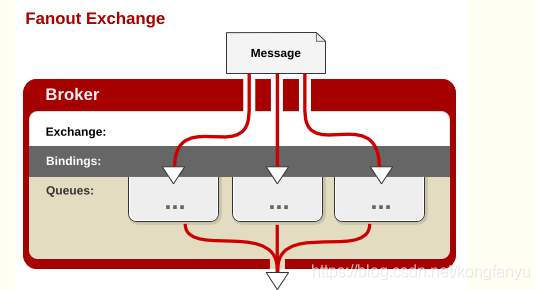
二、fanout廣播模式
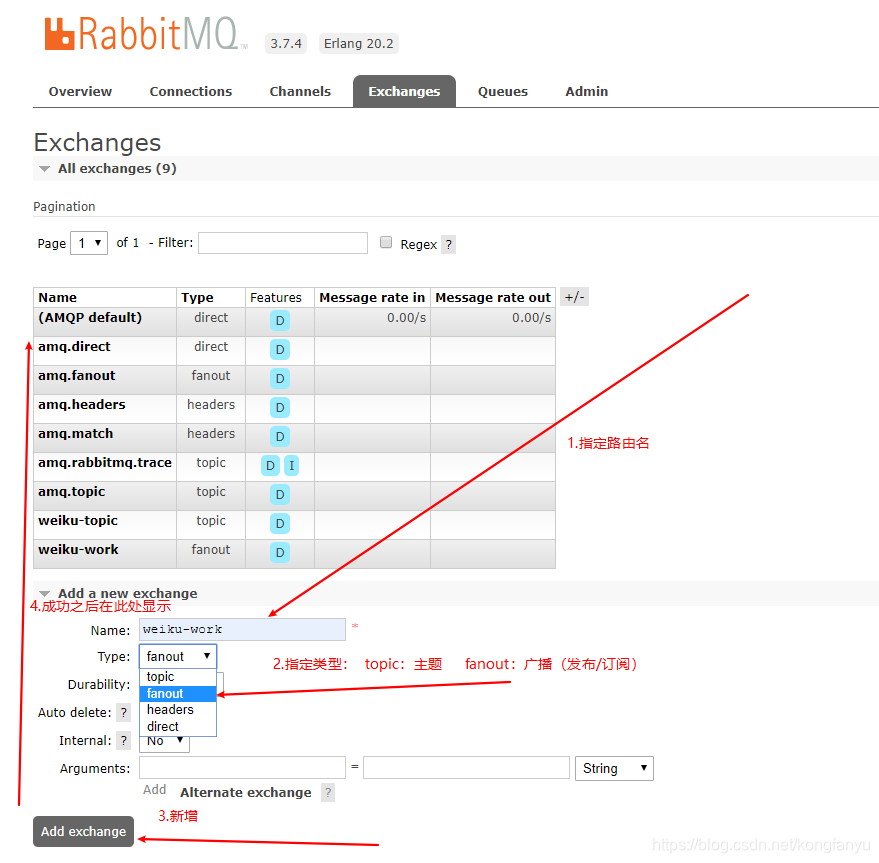
首先需要到RabbitMQ的管理界面新增一個路由交換機(Exchange)
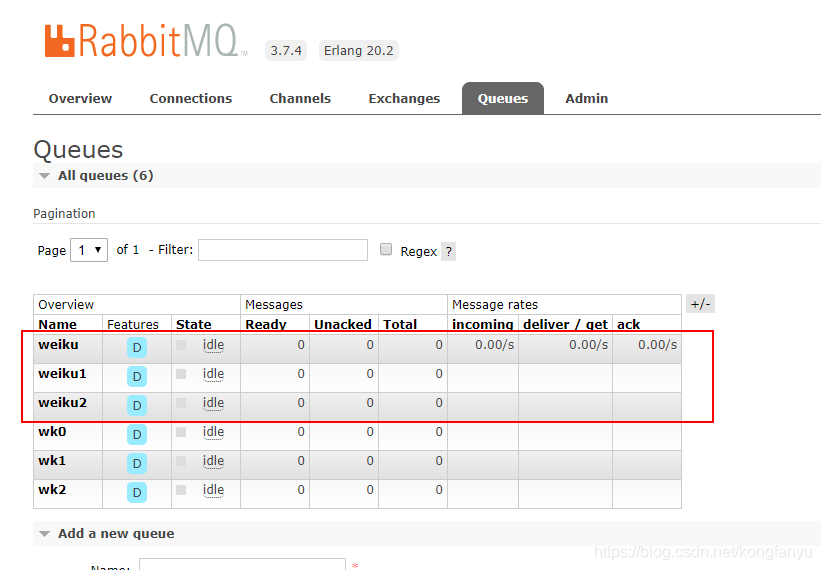
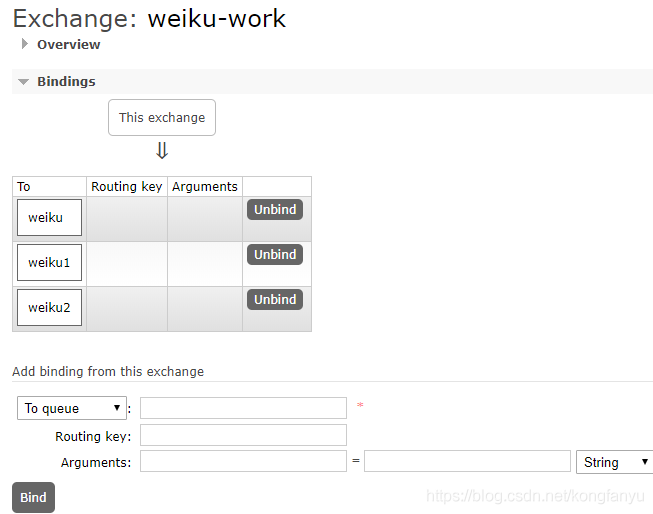
新建完路由之后,需要再新建幾個隊列,如圖:
之后,還沒完,需要把我們新建路由和我們新建的隊列綁定:
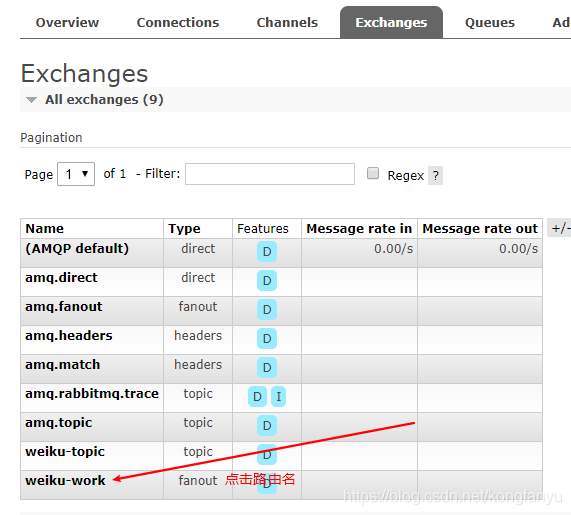
出現(xiàn)如圖界面:
綁定完成之后,開始代碼測試。
5、進(jìn)行 發(fā)布/訂閱 的代碼測試
生產(chǎn)者:
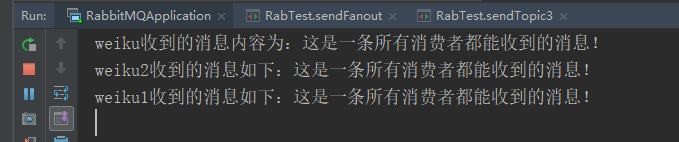
// 廣播的形式發(fā)送,同一個路由下的所有隊列都能接收到消息@Testpublic void sendFanout(){ System.out.println('開始向路由發(fā)送消息(路由下的所有Queue都能收到該消息)'); // 參數(shù)1:路由名 參數(shù)2:可有可無 參數(shù)3:發(fā)送的消息內(nèi)容 rabbitTemplate.convertAndSend('weiku-work','','這是一條所有消費者都能收到的消息!'); System.out.println('消息發(fā)送成功!');}
消費者:
消費者1:
@Component // 需要注入到Spring容器中@RabbitListener(queues = 'weiku') // 指定監(jiān)聽的隊列名public class Consumer1 { @RabbitHandler // 消息接收處理 public void showMSG(String message){ // 得到我們producer中發(fā)送的Object數(shù)據(jù),此處可根據(jù)傳過來的類型來選擇接收,否則拋出異常 System.out.println('weiku收到的消息內(nèi)容為:' + message); }}
消費者2:
@Component // 需要注入到Spring容器中@RabbitListener(queues = 'weiku1') // 指定監(jiān)聽的隊列名public class Consumer2 { @RabbitHandler // 消息接收處理 public void getMSG(String msg){ System.out.println('weiku1收到的消息如下:' + msg); }}
消費者3:
@Component // 需要注入到Spring容器中@RabbitListener(queues = 'weiku2') // 指定監(jiān)聽的隊列名public class Consumer3 { @RabbitHandler // 消息接收處理 public void getMSG(String msg){ System.out.println('weiku2收到的消息如下:' + msg); }}
先運行生產(chǎn)者的測試發(fā)送消息的方法,再運行消費者的SpringBoot啟動類。
運行結(jié)果如下:
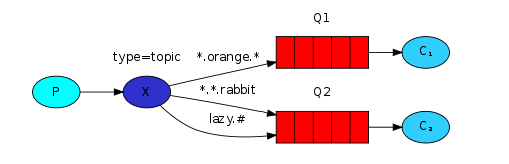
三、Topic通配符模式
topic主題模式模糊匹配,不是精確匹配。
新建一個用來發(fā)送主題的路由
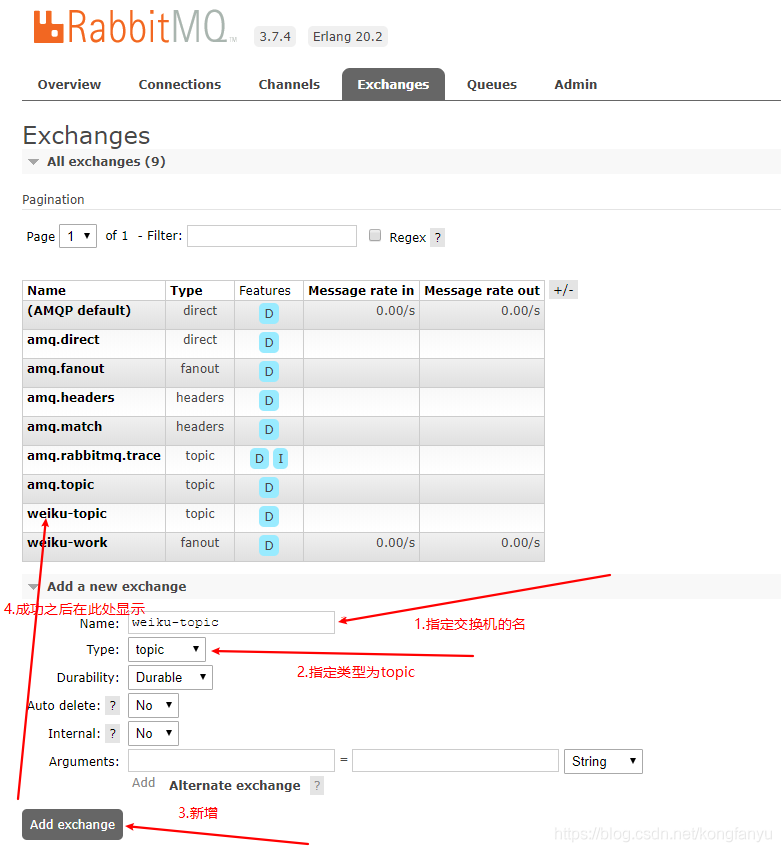
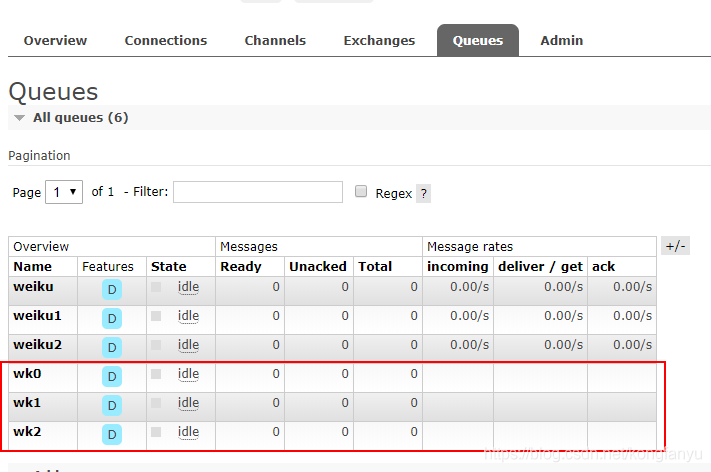
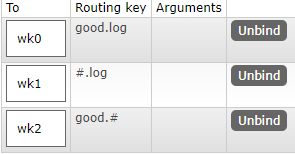
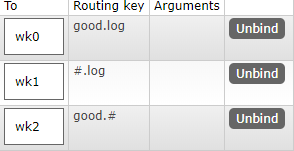
路由新建完之后,新建3個隊列,用來接收發(fā)布的 topic,如圖:
之后還需把我們新建的隊列和路由進(jìn)行綁定,如圖所示:
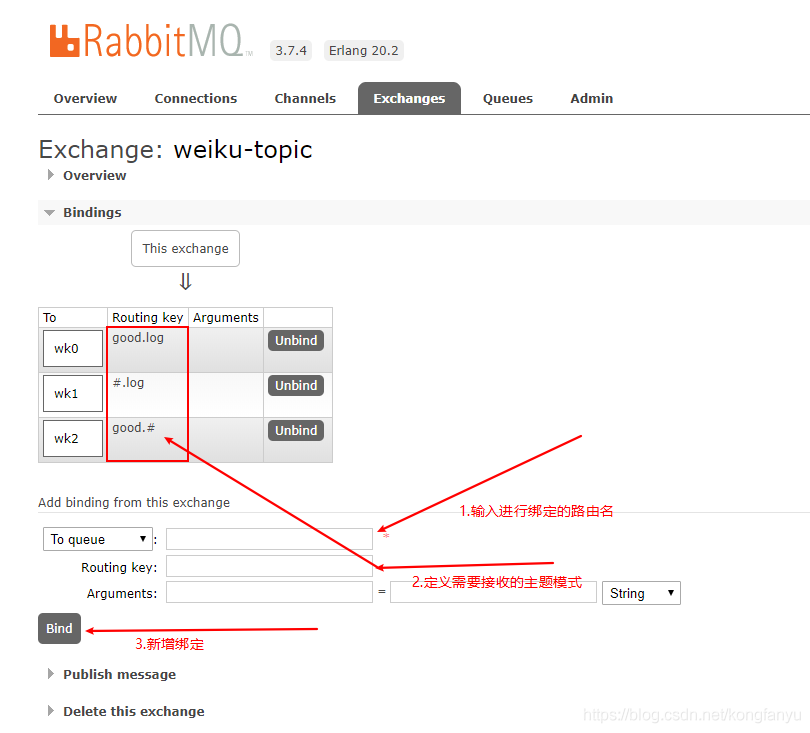
這里的 # 代表所有類型匹配。
以上的準(zhǔn)備完成之后,開始代碼測試:
測試1:
生產(chǎn)者:
@Testpublic void sendTopic1(){ System.out.println('開始向路由中發(fā)送消息!參數(shù)2:routingKey'); // 參數(shù)1:路由器名 參數(shù)2:類似于發(fā)送的規(guī)則名 rabbitTemplate.convertAndSend('weiku-topic','good.log','這是一條good.log消息');}
此處三個隊列都能接收到數(shù)據(jù),因為都匹配。
消費者:
消費者1:
@Component@RabbitListener(queues = 'wk0')public class Con1 { @RabbitHandler public void getMSG(String msg){ System.out.println('wk0收到的消息為:' + msg); }}
消費者2:
@Component@RabbitListener(queues = 'wk1')public class Con2 { @RabbitHandler public void getMSG(String msg){ System.out.println('wk1收到的消息如下:' + msg); }}
消費者3:
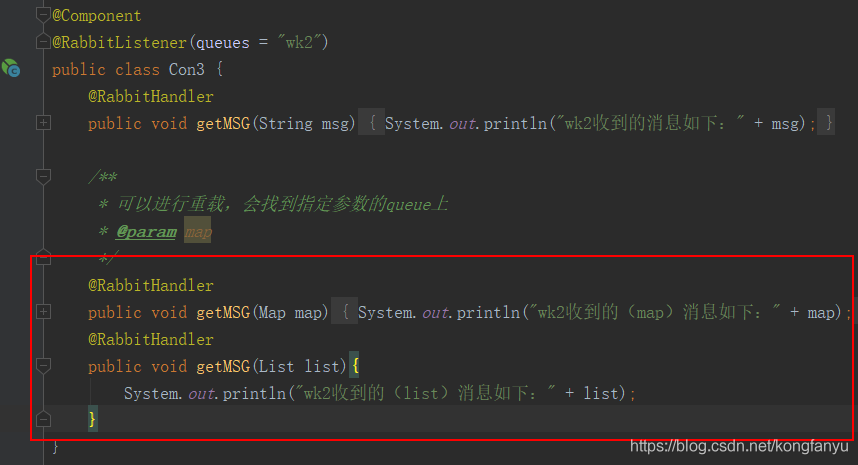
@Component@RabbitListener(queues = 'wk2')public class Con3 { @RabbitHandler public void getMSG(String msg){ System.out.println('wk2收到的消息如下:' + msg); } /** * 可以進(jìn)行重載,會找到指定參數(shù)的queue上 * @param map */ @RabbitHandler public void getMSG(Map map){ System.out.println('wk2收到的(map)消息如下:' + map); } @RabbitHandler public void getMSG(List list){ System.out.println('wk2收到的(list)消息如下:' + list); }}
啟動SpringBoot,運行結(jié)果如下:
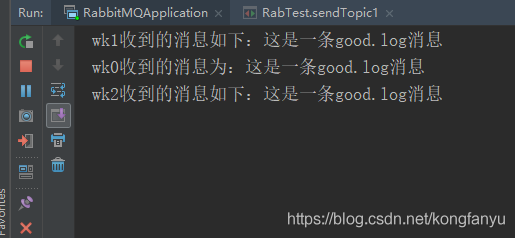
因為這邊3個隊列都符合了規(guī)則,所以都能消費到消息
測試2:
生產(chǎn)者:
@Testpublic void sendTopic2(){ System.out.println('開始向路由中發(fā)送消息!參數(shù)2:routingKey'); rabbitTemplate.convertAndSend('weiku-topic','維護(hù).log','這是一條 維護(hù).log消息'); rabbitTemplate.convertAndSend('weiku-topic','日志.log','這是一條 日志.log消息');}
消費者運行結(jié)果:
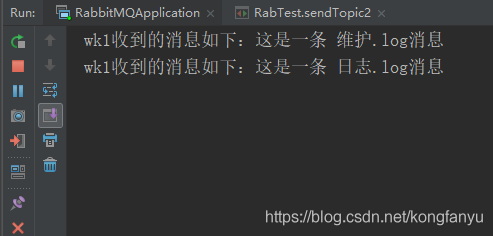
此處只有 wk1 能接收到消息,因為 wk1 符合以 . log 結(jié)尾
測試3:
生產(chǎn)者:
@Testpublic void sendTopic3(){ // 1.準(zhǔn)備發(fā)送的數(shù)據(jù) Map map = new HashMap(); map.put(1,'a'); map.put(2,'b'); List list = new ArrayList(); list.add('qq'); list.add('ww'); list.add('SS'); System.out.println('開始向路由中發(fā)送消息!參數(shù)2為routingKey'); // 2.開始發(fā)送消息(發(fā)送了2條) // 2.1 發(fā)送的數(shù)據(jù)為map類型 rabbitTemplate.convertAndSend('weiku-topic','good.txt',map); // 2.2 發(fā)送的數(shù)據(jù)為list類型 rabbitTemplate.convertAndSend('weiku-topic','good.txt',list);}
消費者運行效果如下:
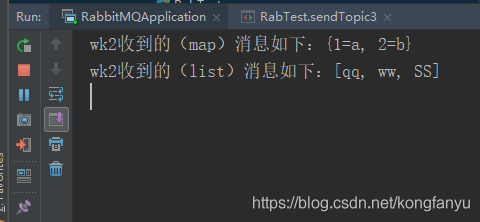
此處只有 wk2 能夠收到消息,且被指定類型的監(jiān)聽器所消費。
至此,我們的測試就結(jié)束了。
到此這篇關(guān)于SpringBoot中使用 RabbitMQ的教程詳解的文章就介紹到這了,更多相關(guān)SpringBoot使用 RabbitMQ內(nèi)容請搜索好吧啦網(wǎng)以前的文章或繼續(xù)瀏覽下面的相關(guān)文章希望大家以后多多支持好吧啦網(wǎng)!
相關(guān)文章:
1. CSS3實例分享之多重背景的實現(xiàn)(Multiple backgrounds)2. XHTML 1.0:標(biāo)記新的開端3. HTML5 Canvas繪制圖形從入門到精通4. XML解析錯誤:未組織好 的解決辦法5. ASP基礎(chǔ)知識VBScript基本元素講解6. asp(vbscript)中自定義函數(shù)的默認(rèn)參數(shù)實現(xiàn)代碼7. 詳解CSS偽元素的妙用單標(biāo)簽之美8. 利用CSS3新特性創(chuàng)建透明邊框三角9. 使用Spry輕松將XML數(shù)據(jù)顯示到HTML頁的方法10. XML入門的常見問題(四)

 網(wǎng)公網(wǎng)安備